Showing posts with label sketch template. Show all posts

Monday, April 13, 2015

We Are Really Doing This!

The title is what I said to Chris riding the monorail on our way to Magic Kingdom for our first day at Disney World! Except it started with "I can't believe" haha! Little did we know the craziness that would ensue that day, but there will be more to come on that :)


I used another sketch template from Simple Scrapper's Premium Membership and look at that, a real button/pin that we got when we purchased our tickets! I didn't remember until after I planned this layout that I wanted to use that button here, so when the layout started looking a bit busy, I left the white card stock open towards the bottom to try to provide some eye relief, even though I filled it with journaling.


The Premium Membership at Simple Scrapper provides skills and shortcuts to help you simplify and find more meaning in your memory keeping.

Thursday, April 9, 2015

April Simple Scrapper Layouts!

I am behind on posting these layouts, but the April Premium membership materials are available at SimpleScrapper.com and I truly enjoyed working with them! You can ask 5 different members at Simple Scrapper, what makes the membership worthwhile and you can get 5 different answers! I think the number 1 value is just the help Jennifer Wilson (owner) gives you to use supplies, make time for scrapbooking, and overall simplify everything from photos to finished albums/projects!

But what really made me sign up originally as a member last year were the sketch templates! I didn't know much about what they were, but simply put, they are sketches provided as a regular jpeg file that you can simply open and use to get your layout started AND they come as layered templates that you can open in Photoshop/Photoshop Elements, and use them in their complete digital format to create a digital, hybrid, or regular layout! As a regular paper scrapper, I didn't know how much I would love that they came as layered templates too until I opened one one day, and dragged in my photos to get a feel for how a layout would look before I printed my photos to size and then worked with physical products after that. I LOVE getting to see how my photos might work or even what color papers might work first.

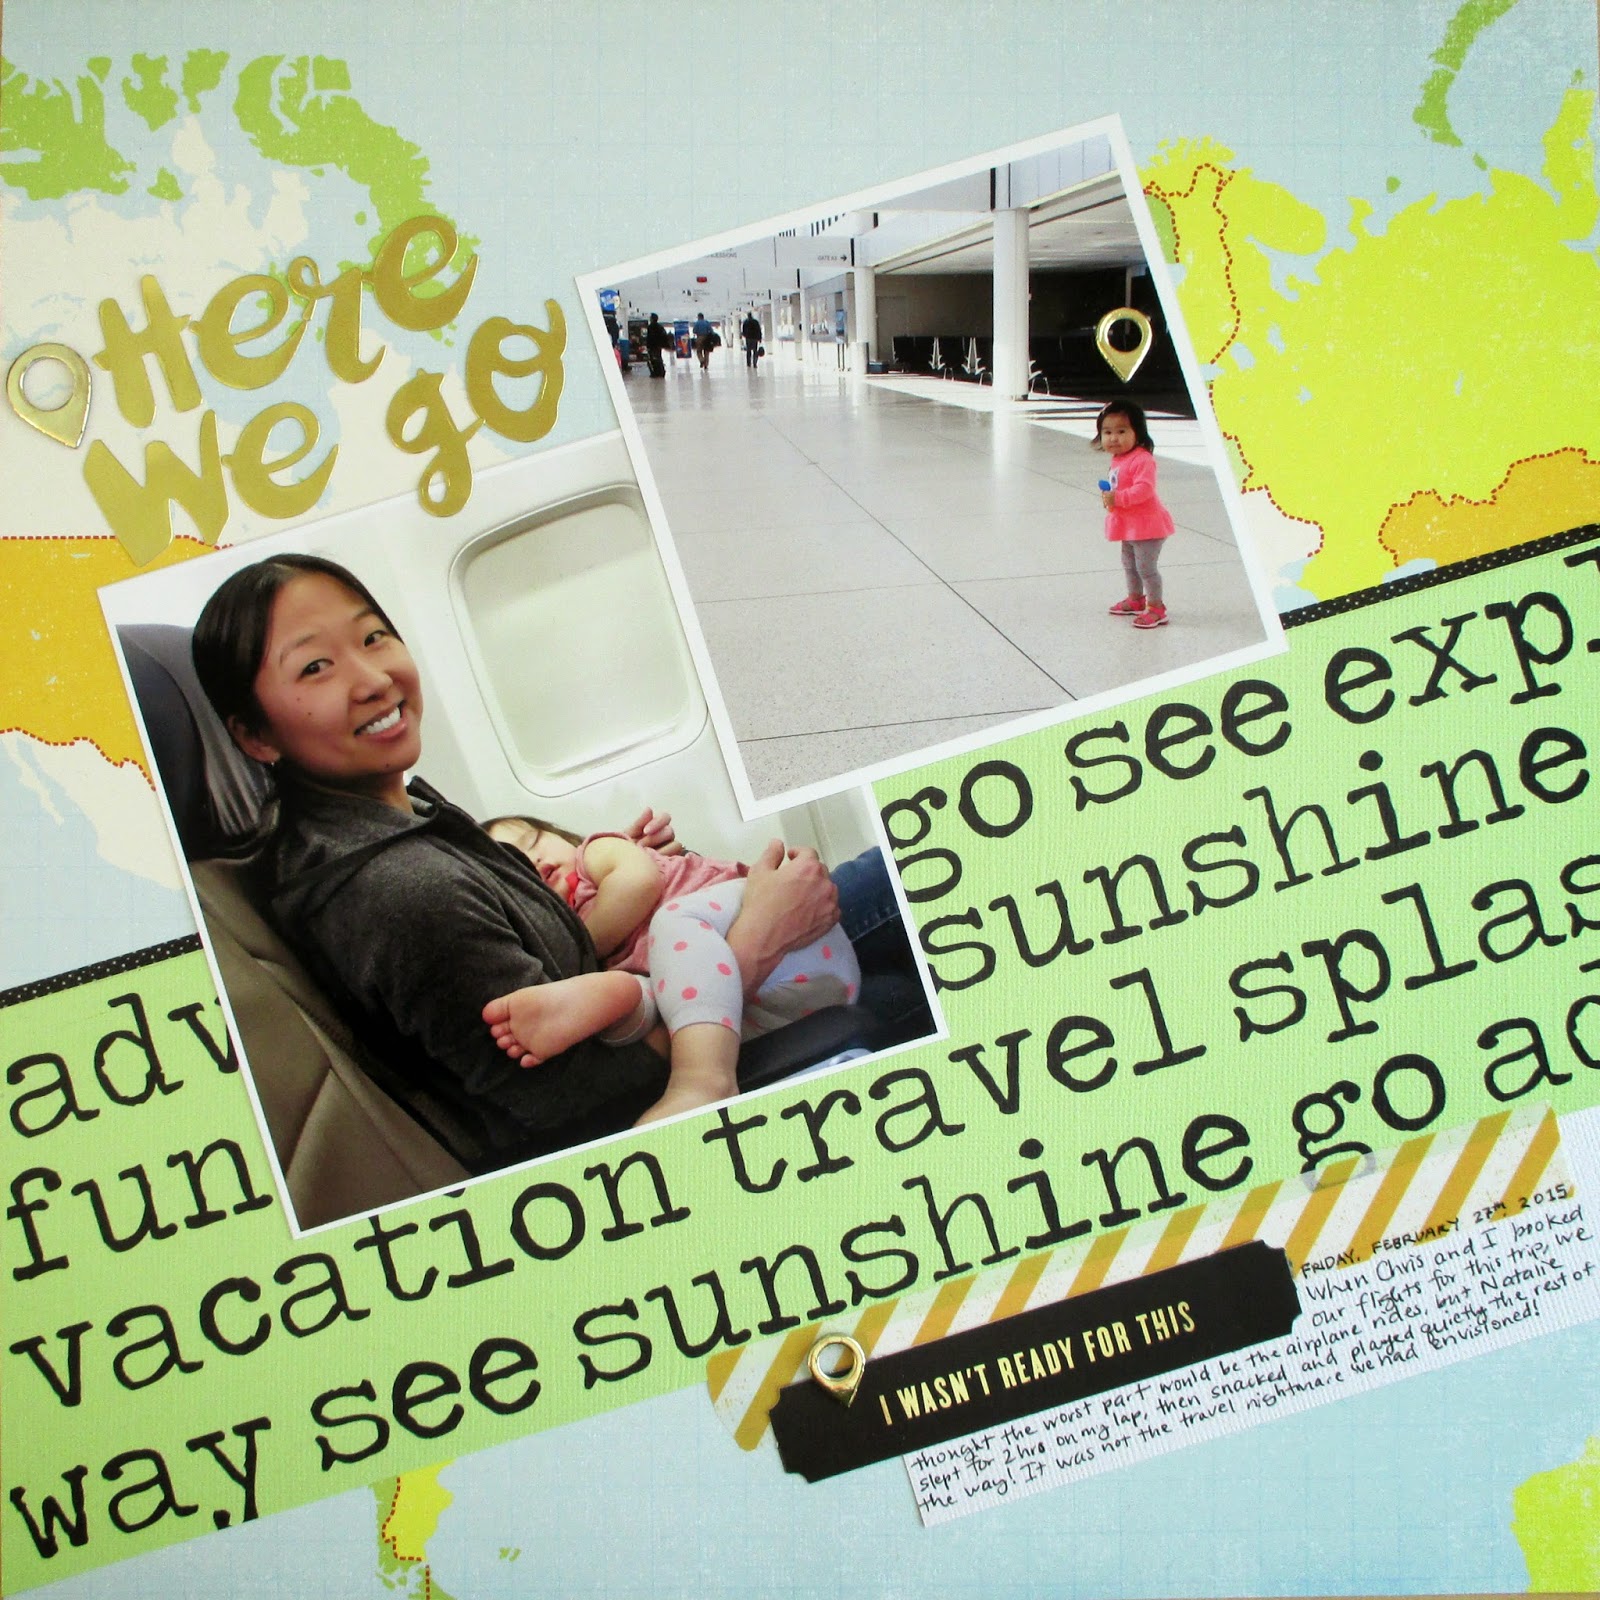
Anyway, so this first layout I used a new sketch template to create this travel layout, for a trip we took to Disney World at the end of February!


I made the travel words paper myself, by printing it out onto 8.5x14 (legal size in the US) and then cutting it to 12inches across!


For this next layout, I began with this month's story starters that are about faith and spirituality. The story starters are a great part of the membership as well, often I end up documenting something that I wouldn't normally if I didn't challenge myself to use them each month! Since I am a Christian and a Mom, so I got a chance to document my daily intentions with Natalie - namely, trying to start everyday by reading the Bible and praying! She says the cutest little prayer now too, simply, "thank you Jesus, amen!" haha!


I also used an older sketch template and again, it just makes it so easy to piece together a layout by starting with the sketch templates! And guess what, the membership provides 5 new sketch templates every month! That's 60 a year... that's a lot of inspiration and layouts to make!!


The Premium Membership at Simple Scrapper provides skills and shortcuts to help you simplify and find more meaning in your memory keeping.

Tuesday, February 10, 2015

C&N

First of all, my apologies for not updating my blog recently! Since my last post I've made 2 more layouts, finished my December Daily album, and made 2 cards, plus I've worked on some art work for myself and others. I hope to share some more of that here soon, but until then please follow me on Instagram: @ScrapperEmily!

ABOUT THE PHOTO:
Anyway, today's photo is from a lovely (aka not so lovely) and cold Friday night last month, so Chris and I decided to have a coffee date at Wegmans, our local+fave grocery store. The coffee was excellent, and it was perfect just to get out of the house for a bit and also get some errands done.


LAYOUT DESIGN/MY PROCESS/PRODUCTS USED:
I used a Sketch Template from Simple Scrapper's Premium Membership, then changed it up a bit to work with my photo and papers. I used this month's Cirque kit from Studio Calico, which went perfectly with the "date night" theme of my layout haha!


The Premium Membership at Simple Scrapper provides skills and shortcuts to help you simplify and find more meaning in your memory keeping.

Monday, January 19, 2015

Just Like Her Dada

ABOUT THE STORY/PHOTO:
Part of my "scrappy resolution" or intention this year is to do more "story first" layouts, so I don't end up with a whole bunch of layouts that look nice but have no meaning. So when I didn't have any photos printed up yet, but wanted to work on a layout, I started by reading over the few stories I wanted to scrap and decided on this story about my daughter, who talks in her sleep just like her Dada! Since I didn't have a specific photo for this story, I found this recent one in my phone of her yawning and thought that would work! Now I could make a layout with a cute photo and have a story to go with it, perfect!


LAYOUT DESIGN:
I used a new Sketch Template from Simple Scrapper's Premium Membership and just loved it! It was 8.5x11, so I decided I would keep it 8.5x11 and add the page to Chris' ongoing album!


MY PROCESS/PRODUCTS USED:
I used some of the softer, pretty papers from the main Far Far Away scrapbook kit by Studio Calico - and it helped that I had the digital papers to first drop into the layered templates that are part of the monthly sketch templates from Simple Scrapper. I enjoy working with the layered templates first to get a general feel how my layout will look with the photos dropped in! I used of the thin wood veneer diamonds to fill the space next to the picture, and ended up liking how it sort of points to the picture. I used the rubber alpha from the Walden kit because I wanted a nice soft gray to go with the colors. Thanks for stopping by!


The Premium Membership at Simple Scrapper provides skills and shortcuts to help you simplify and find more meaning in your memory keeping.

Wednesday, January 14, 2015

Love layout and a FREE file for cutting + tutorial!

ABOUT THE PHOTOS:
What's wrong with a green Christmas? This was the day after - we got to go for a walk while Chris was still home for Christmas break, so nice!!


LAYOUT DESIGN:
I used a Sketch Template from Simple Scrapper's Premium Membership and just LOVED this one, but needed to change a couple things to make it work for me.


MY PROCESS/PRODUCTS USED:
So I started by making the "Love" title myself and turning it into a cut file to cut out of white paper to match the background. (see below for quick tutorial how I did this, as well as the title as a jpg for free download!) I put my three strips of paper down approximately where they would go and traced the top portion of the title with pencil then hand cut with scissors a little above the pencil marks to leave some extra space above the title. I also die cut some sketchy hearts in all different sizes in 3 card stock colors and just played around with filling in the top area with them till I got them how I wanted them, then picked up each one and adhered with my Martha Stewart glue pen! Phew! Other than that I stuck pretty closely to the sketch template and used Studio Calico's Far Far Away scrapbook kit to complete it.


CUT FILE FOR DOWNLOAD (png file):
Click here!
Right-click and you can download it :)


Beginner tutorial for Silhouette Cameo (how to turn image into cut file):
Open your Silhouette software, this is what you'll see:

Open the file you want to trace, and make sure to select "All Files" from the file type dropdown:

When you open it, it will open huge and also have a warning sign about the resolution, but unless you plan to cut that large, you can ignore that and resize to about where you want it.

(to resize: select the image by clicking on it, then grabbing one of the corners to resize and keep the proportions).

Here's the crux of tutorial:
1. Click the tracing tool
2. Click "Select trace area"
3. Make a box around the image
4. Uncheck "high pass filter"
5. Click "trace"
Then you can remove the original image by selecting it and deleting it, and you are left with your cut file!


The Premium Membership at Simple Scrapper provides skills and shortcuts to help you simplify and find more meaning in your memory keeping.

Tuesday, January 13, 2015

Natalie's First Snowfall

ABOUT THE PHOTO:
It was unexpected. We were walking into the store on New Years' Eve to get some snacks and I was carrying Natalie when I realized she was just so amazed and amused by the falling snow! She was laughing and squealing with delight, and kept reaching up trying to reach the snow! When a snowflake landed on her face, she was surprised and declared "water!" and it was too cute not to stop in the freezing cold and get a couple pictures!


LAYOUT DESIGN:
I started the layout by using a Sketch Template from Simple Scrapper's Premium Membership, but veered from it once I decided to do a big title.

MY PROCESS/PRODUCTS USED:
To do the title, I first wrote it out and tried to make it a "clean" brush script so that it wouldn't have too many jagged edges when I went to cut it. I photographed it and turned it into a digital print and then got it into my Silhouette software and sized it. I actually cut it into that white background paper so I could try different papers and see which one looked best. Glad I did too because that rose print from Studio Calico's Park Ave kit wasn't my first choice, but as soon as I backed it, it looked perfect!


The Premium Membership at Simple Scrapper provides skills and shortcuts to help you simplify and find more meaning in your memory keeping.

Monday, January 12, 2015

A Night Out

ABOUT THE PHOTO:
This photo was taken at Chris' company holiday party, where we finally got a night out to ourselves, so it was also like a nice date! I decided to make the journaling a thank you letter format to Chris for working hard and allowing me to be a stay at home mom. I truly appreciate his willingness, support, and hard work!


LAYOUT DESIGN/PRODUCTS USED:
I used another Sketch Template and Story Starter from Simple Scrapper's Premium Membership for this one, and had the perfect papers from last month's Park Ave kit by Studio Calico!


MY PROCESS:
I also added a rubber banner from Ali Edwards' December Daily kit that balanced out the title and added a little something to it. The chipboard stars from the Waldorf Add-on kit were a nice bonus too.


The Premium Membership at Simple Scrapper provides skills and shortcuts to help you simplify and find more meaning in your memory keeping.

Sunday, January 11, 2015

Hello Today

ABOUT THE PHOTO:
My mom, stepdad, and I took Natalie to the farm last fall and she was just being so sweet. She was so gentle petting the goats and looking for me to tell her that she could pet them, I just wanted to capture some of her personality traits.


LAYOUT DESIGN:
I finally got a chance to use an awesome sketch template from the Simple Scrapper's Premium membership archives. Loved this one!


MY PROCESS/PRODUCTS USED:
I decided to grab some older products for this one, starting with some papers from the Bluegrass Farm kit by Studio Calico, because I knew they'd go well with the photo. I found some fairly neutral/white papers to journal on so they'd stand out some and used a Faber Castell soft brush pen to add to my journaling a little bit.


The Premium Membership at Simple Scrapper provides skills and shortcuts to help you simplify and find more meaning in your memory keeping.

Saturday, January 10, 2015

You Are My Fave

ABOUT THE PHOTO(S):
I'm back with some layouts to share over the next few days! I hope to keep up a little better this year, and update at least once a week with what I've worked on. Anyway, I had this cute photo of Natalie in her winter gear that I couldn't resist adding to her scrapbook!


LAYOUT DESIGN/MY PROCESS:
I didn't really have a story for this photo, so I used a Story Starter from Simple Scrapper's Premium Membership to add my journaling. (I finished on the back to write about how much I appreciate how my husband "invites" us to hang out with him whenever he has things to do, no matter how "boring" it is.) I also used an older sketch template from Simple Scrapper as well - I flipped it on its side to work with my vertical photo!


PRODUCTS USED:
I used Studio Calico's Park Ave kit, as well as the Waldorf Add-on kit, that is quite possibly my favorite add-on kit... in recent memory? I'm scared to say of all time, but anyway, that polar bear stamp was too adorable not to use, and I really loved how Catherine Davis used the digital stamp version to make her background on this layout!


The Premium Membership at Simple Scrapper provides skills and shortcuts to help you simplify and find more meaning in your memory keeping.

Friday, December 19, 2014

Sharing Our Story

ABOUT THE PHOTO:
My daughter and her 3 boy friends, no not boyfriends, she's only 16 months old!! Even though I used a photo from this same day for my 30 Days of Thankful album, I used it to write about my friend Rachel and how we came to be friends and then introducing me to her friends which are now my friends etc. I finally got this story down on paper after using a Story Starter from Simple Scrapper's Premium Membership! The story starters are really helping me go much deeper with my stories and not just scrapbooking by event (not that there's anything wrong with that either, I am liking a mix of both)!


LAYOUT DESIGN:
So of course I also used a Sketch Template from Simple Scrapper's Premium Membership, this time an older one (the membership provides you access to ALL of the previous sketch templates and story starters - a tremendous value I might add!).


MY PROCESS/PRODUCTS USED:
So once I picked the sketch template, I just had to use the papers from this month's Park Ave kit by Studio Calico... oh how I wish it wasn't December and I've been so busy with December Daily, I don't know that I'll get much more done in terms of layouts, because I LOOOVE all the papers in this kit!! Ahh!!


The Premium Membership at Simple Scrapper provides skills and shortcuts to help you simplify and find more meaning in your memory keeping.

Saturday, December 13, 2014

Discover

I'm taking a break from December Daily to bring you a 12x12 layout for the Simple Scrapper Creative Team!

ABOUT THE PHOTO(S):
I had a bunch of photos from Natalie's first trip to the museum back in September, but didn't get a chance to scrap them till now.


LAYOUT DESIGN:
I used a Sketch Template from Simple Scrapper's Premium membership and ended up combining a couple of them and rearranging one to come up with this layout! So if you saw either of the original sketch templates, you may not even recognize that this layout came from either one! I also used a story starter to help tell a deeper story other than, today we went to the museum. I finished my journaling on the back to talk about how I suddenly realized how much easier Natalie had gotten once she could walk and go where she wanted to go, and how I felt very hopeful and excited seeing her walking all around the museum and I just had to follow along with the stroller.


MY PROCESS/PRODUCTS USED:
I used this month's Park Ave kit from Studio Calico, along with some stuff from my stash (pink cork stars that I just ordered, wood veneer letters, and printable labels from another month by Hello Forever). For the large circle, I printed it in a large format rectangle and instead cut the circle from the paper with my Silhouette and laid it over the photo - it made it much easier than trying to line up a cut on the picture itself.


The Premium Membership at Simple Scrapper provides skills and shortcuts to help you simplify and find more meaning in your memory keeping.

Tuesday, November 18, 2014

Instagram Snapshot

ABOUT THE PHOTO(S):
I decided to use a Sketch Template from Simple Scrapper's Premium Membership and make a layout of my last 12 Instagrams as sort of a feed capture right now!


LAYOUT DESIGN:
The sketch template made it easy to get going on this, but I changed it up a little with my placement of the Instagram captions.


MY PROCESS/PRODUCTS USED:
I used very little product in this - a piece of paper from the Pine Hill add-on kit from Studio Calico, letter thickers and 4x6 papers cut up from the Walden main scrapbook kit, and thin washi tape that was part of the Bluegrass PL kit from Studio Calico back in April.


The Premium Membership at Simple Scrapper provides skills and shortcuts to help you simplify and find more meaning in your memory keeping.

Sunday, November 16, 2014

Shine

ABOUT THE PHOTOS:
This photo was taken last year on December 1st for December Daily! Why am I just now scrapping this photo? I began this layout "story first" by using a Story Starter from Simple Scrapper's Premium Membership. I had a story that I started to write, and ended up with a much deeper story that I printed and slipped into the glassine bag pocket. It's been interesting how using these prompts has really made my pages seem more meaningful, when I honestly didn't think much would change!


LAYOUT DESIGN:
Onto the layout design, I again used an older Sketch Template from Simple Scrapper's Premium Membership! I really stuck closely to the sketch template, even though it was for an 8.5x11, I easily stretched it to work with 12x12. At first I was thinking I didn't "change" it enough from the template, but then I realized that's why I love the templates - when someone goes back to look at my pages years from now, they will not be thinking, "Oh, this is like an exact replica of such and such Sketch Template from Simple Scrapper" haha! (I'd be impressed if they did!) Anyway, I love how the membership includes these templates, that come to you as a layered PSD template as well as just sketch image, so I can drop my photo(s) in and see how the end result might look and move things around even if I don't work fully digital!


MY PROCESS/PRODUCTS USED:
I used this month's Christmas themed add-on kit, Pine Hill, from Studio Calico, as well as a few items from my stash. The 3x4 card was from a printable set by Geralyn Sy for In A Creative Bubble from last year and the vellum label is from Crate Paper a couple year's ago. The glassine pocket came with this month's kit and Chris just came downstairs and looked at it and goes "that's cool you used an eggroll bag" hahaha.


The Premium Membership at Simple Scrapper provides skills and shortcuts to help you simplify and find more meaning in your memory keeping.

Sunday, November 9, 2014

Hello Deer

ABOUT THE PHOTO/STORY:
I love that this photo looks like, ah nice fall day with Natalie at the park. But looks can be deceiving, in fact, Chris was feeling quite ill but he still offered to take me to the park to snap some photos of me after hearing me fret about not having a good head shot for the Simple Scrapper Creative Team!


LAYOUT DESIGN:
I used a Sketch template from the Simple Scrapper's Premium membership - something I've done quite a bit, but this is my first layout for the Creative Team; how fitting!


MY PROCESS/PRODUCTS USED:
I ended up printing up one large photo and wanted to make it look like a "window". Originally I was going to cut out the squares, but to save me a little work lining them all up perfectly, I just kept them on the photo paper and went with a piece of white card stock to hide it. I used some older leaves from Amy Tangerine and a gray tag I had in my stash. This was a fun one - I really love working with the sketch templates from the Simple Scrapper!


The Premium Membership at Simple Scrapper provides skills and shortcuts to help you simplify and find more meaning in your memory keeping.

Tuesday, September 30, 2014

Sweet

ABOUT THE PHOTO:
There is just something about Daddies and their daughters that is too cute! Of course Natalie and her friend were a little more interested in getting into that pool with the nice warm water that Chris filled with buckets of warm water from the basement, what a guy!


LAYOUT DESIGN:
I started with an older sketch template from the Simple Scrapper, but ended up changing it once I found those tags to use.


MY PROCESS/PRODUCTS USED:
So I cut up some pieces of paper from the Poet Society kit by Studio Calico but still felt like there was a lot missing. I dove into my stash when I wasn't feeling like the Poet Society embellishments would work for this layout. I found those Dear Lizzy tags and then went with some other Dear Lizzy products, then hand cut a few pieces to go with it! This layout took me longer to complete because I basically had to pull the supplies together instead of just relying on one kit. Hoping I can catch up with my photos soon!

Sunday, September 21, 2014

Come Back

ABOUT THE PHOTO(S):
OK, so our girls didn't exactly want to sit and smile for the camera - so these were the best shots we got! Natalie was especially upset that I wouldn't "walk her" where she wanted to go, but luckily now she can walk without me finally!


LAYOUT DESIGN:
I used another older sketch template from the Simple Scrapper, this time for the Stash Bash event going on right now there!


MY PROCESS/PRODUCTS USED:
This is my 4th layout using the Sandlot kit from Studio Calico - I just got the main scrapbook kit and the matching 4x6 pad of paper, and I think I am done using it and ready to move onto this past month's kit before the next one shows up! Thanks for stopping by!

Tuesday, July 8, 2014

Funny Girl

ABOUT THE PHOTOS:
Just some quick snapshots I took of me and Natalie playing (the same day as the last layout at 9 months old)... she was being funny sticking her tongue out whenever I did and just being her silly self (when she's not hungry or ready for a nap of course)!


LAYOUT DESIGN:
I used a sketch template from this month from the Simple Scrapper. If you are a premium member of SimpleScrapper.com, you get 5 new sketch templates each month plus access to download all the archived ones! I am definitely getting my money's worth from the membership - I save lots of time trying to plan out my layouts and can get right to work and lately I've been able to start and finish a layout in under 2 hours!


MY PROCESS/PRODUCTS USED:
I dug a little more into the latest Studio Calico kit, Penny Arcade, except for the background piece of paper was a lighter blue from a previous kit. I used the 4x6 add-on pad of paper to get the pieces for layering so I didn't have to cut into my 12x12 sheets yet. This definitely helped me go for this layout without hesitation. Sometimes if a layout I want to do needs lots of smaller pieces of paper, I will wait towards "the end" of the kit, but this let me not worry about that! This isn't my favorite layout, but I really like the way it looks next to my previous layout in my album.

My New Ride

ABOUT THE PHOTOS:
Natalie's grandma brought over this riding toy zebra, so Chris put it in the front lawn where we were sitting. The first thing she did was climb up and stand on it with her feet on the seat haha!


LAYOUT DESIGN:
I used another older sketch template from the Simple Scrapper, because I had already printed my photos 4x6 and 2 at 3x4 and was sort of stuck on how to lay them out till I saw this one from the archives!


MY PROCESS/PRODUCTS USED:
I used the Hello Hello kit from Studio Calico, except for the background piece of paper which was a piece from Amy Tan's original collection Amy Tangerine by American Crafts - I went to my stash because I wanted a neutral grayish piece, but didn't want a plain card stock.

Thursday, June 26, 2014

Beep Beep

ABOUT THE PHOTO: From Mothers Day again, Natalie really loved that little wagon car, and "driving" but also couldn't resist taste testing the horn haha!


LAYOUT DESIGN: I finally used one of June's sketch template from the SimpleScrapper.com (Jennifer Wilson), which got derailed so far this month because I'm working on finishing my Day In The Life album from May, had to make lots of cards this month, and ended up on a Staycation that didn't allow for much scrap time in the end.

PRODUCTS: This is only my second layout using June's Hello, Hello kit from Studio Calico. I'm hoping to get a couple more done before the next kit gets here! The "Let's Go" globe is part of a free cut file offered at Studio Calico (CLICK HERE) from the Wanderlust collection! The letter thickers were from the Front Row kit in February of 2013!


PROCESS: I mounted all the paper onto a cheap white piece of card stock so I could cut out the middles of the dark blue and teal background papers to save for later. I didn't have a full 12x12 sheet of that teal paper left, anyway, so I trimmed it to 8.5x11 and love how it sort of draws the eye to the photo. I splattered the white grid paper with Mister Huey's spray mist and cut out the words from another piece of paper.

Saturday, May 31, 2014

My 1st Mothers Day

My first Mothers' Day!! Fittingly, I woke up to Natalie throwing up on me at 6am :)


This layout came together really quickly yesterday, once I decided to use the last sketch template for May from the SimpleScrapper.com! The sketch used a 3x4 photo, so I swapped one of the layers behind it that was a 4x6 so I could print my photo 4x6 and use that instead!


I decided to find an old Studio Calico kit to use since I have used up most of Bluegrass Farm and Camelot now, so I went back and chose last May's kit, Planetarium! I chose that one specifically because generally all the "May" kits sort of go with May photos. I was able to use a whole pack of those banner clip embellishments and then I added some tags and found a doily and some letter stickers and really came together very fast!