Showing posts with label Silhouette. Show all posts

Wednesday, January 14, 2015

Love layout and a FREE file for cutting + tutorial!

ABOUT THE PHOTOS:
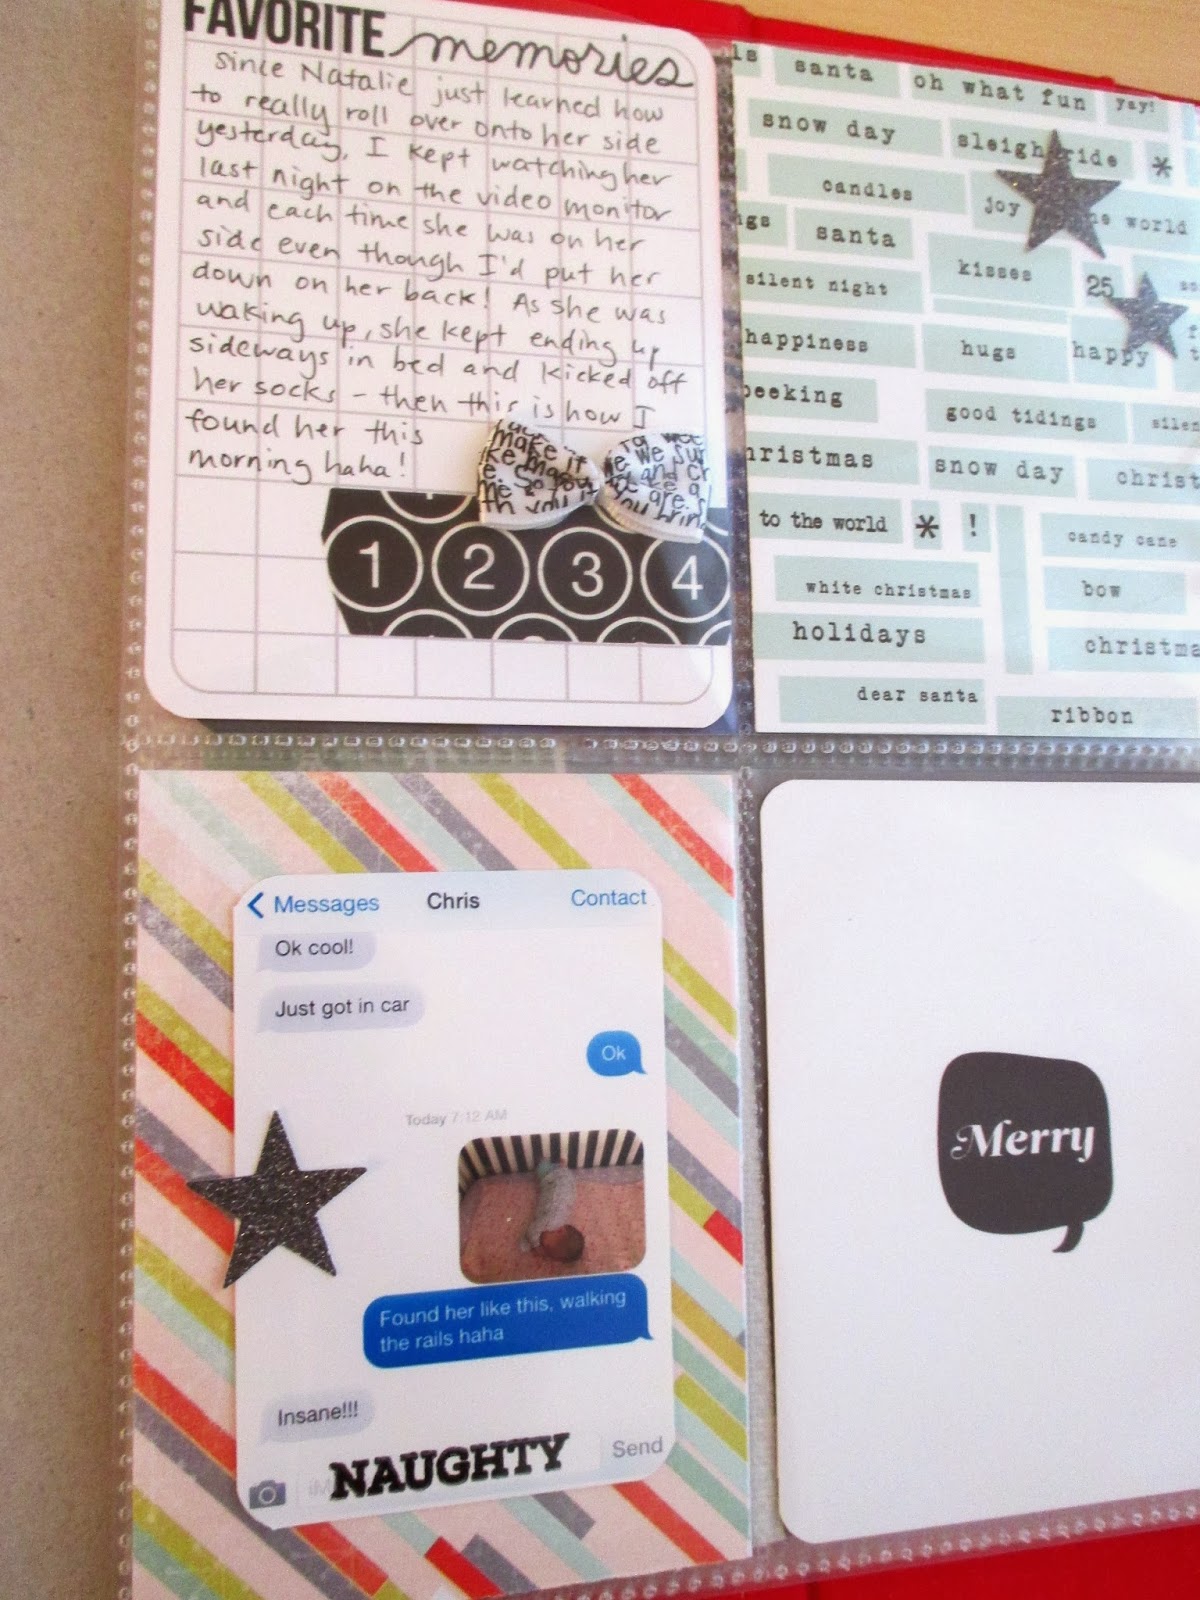
What's wrong with a green Christmas? This was the day after - we got to go for a walk while Chris was still home for Christmas break, so nice!!


LAYOUT DESIGN:
I used a Sketch Template from Simple Scrapper's Premium Membership and just LOVED this one, but needed to change a couple things to make it work for me.


MY PROCESS/PRODUCTS USED:
So I started by making the "Love" title myself and turning it into a cut file to cut out of white paper to match the background. (see below for quick tutorial how I did this, as well as the title as a jpg for free download!) I put my three strips of paper down approximately where they would go and traced the top portion of the title with pencil then hand cut with scissors a little above the pencil marks to leave some extra space above the title. I also die cut some sketchy hearts in all different sizes in 3 card stock colors and just played around with filling in the top area with them till I got them how I wanted them, then picked up each one and adhered with my Martha Stewart glue pen! Phew! Other than that I stuck pretty closely to the sketch template and used Studio Calico's Far Far Away scrapbook kit to complete it.


CUT FILE FOR DOWNLOAD (png file):
Click here!
Right-click and you can download it :)


Beginner tutorial for Silhouette Cameo (how to turn image into cut file):
Open your Silhouette software, this is what you'll see:

Open the file you want to trace, and make sure to select "All Files" from the file type dropdown:

When you open it, it will open huge and also have a warning sign about the resolution, but unless you plan to cut that large, you can ignore that and resize to about where you want it.

(to resize: select the image by clicking on it, then grabbing one of the corners to resize and keep the proportions).

Here's the crux of tutorial:
1. Click the tracing tool
2. Click "Select trace area"
3. Make a box around the image
4. Uncheck "high pass filter"
5. Click "trace"
Then you can remove the original image by selecting it and deleting it, and you are left with your cut file!


The Premium Membership at Simple Scrapper provides skills and shortcuts to help you simplify and find more meaning in your memory keeping.

Thursday, October 2, 2014

Be Brave

ABOUT THE PHOTO(S):
This was the best part of our visit from our friends - watching our girls in the inflatable pool! Natalie LOVED when she slipped in and it happened to be nice, cozy, warm water instead of hose water - she just sat back and chilled out, I'd never seen her do that before! Her friend on the other hand, LOVED the bottom of the pool that was bouncy and inflatable and she was bouncing on her little coolie the whole time!


LAYOUT DESIGN:
The layout was sort of guided by the 3 photos that I had printed 4x3 that I definitely wanted to include in some sort of progression as Natalie is sinking into the water.


MY PROCESS/PRODUCTS USED:
Originally I started with a busy background piece of paper and tried to add those three diecut titles (from the More Bright Ideas class from Studio Calico with Nicole Samuels, created by Geralyn Sy for In A Creative Bubble). The titles got lost on the busy paper so I die cut a black border to go around them, but it still looked a bit too crazy. Then this morning I read the latest article in Spark Magazine from the Simple Scrapper premium membership about white space and decided my page was looking too crazy and busy. I made white space by changing up my background paper to black card stock and allowing it to breathe! Ahhh! The titles now stood out great, so I just added minimal embellishments and some journaling. The paper to cut the titles was from the Printshop collection and the striped piece is from the Brighton Pier collection.

Saturday, July 12, 2014

CCW Babies

ABOUT THE PHOTO(S):
This is what 4 babies on a hot day looks like when they are each ready for a nap and not feeling like smiling for a picture haha!


LAYOUT DESIGN:
Originally I had something else in mind completely, but when I started picking out papers to use, I came across this happy cloud paper from the most recent Studio Calico kit, Penny Arcade and I just thought it looked so funny in contrast to the picture of 4 miserable babies, none of whom are smiling haha! So I couldn't resist using it!


MY PROCESS/PRODUCTS USED:
I didn't want to cover too much of that paper, so I cut out the cloud using this cut file by Geralyn Sy, on my Silhouette Cameo. I went around the edge of it with a black pen to stand out, and backed it with pink paper and actually I cut out a piece of the cardboard backing from the 4x6 pad of paper I bought with this month's kit! I sewed the lines with a light silver colored thread and added the metallic stars from an older kit.

Thursday, May 1, 2014

Sprinkle

Last month, my friend had a surprise sprinkle shower for her sister-in-law and our other friend, for her 4th baby! She was so surprised, she cried and then made everyone else cry and it was so beyond sweet! The whole shower was so lovely, especially because everyone pitched in to help do something for it! My friend who hosted it, made an awesome cake with a little "Baby" banner, a clothesline decor with onesies, and mason jars with name tags! She decorated in soft colors - "shabby chic" and then someone else made a diaper cake, I made a "Baby Girl" banner, someone brought a bouquet of roses made from strawberries, another bouquet of real flowers, lots of desserts and treats, and well - I printed up a lot of pictures for this one, to show how "Pinterest-y" the party was!


I used a cut file by Paige Evans for Studio Calico to cut the frames. First I cut just the outer edges from that woodgrain paper, then I cut all the frames from the yellow polkadot paper. I had sized down my photos in Photoshop Elements and placed them generally where I thought they would go - luckily able to open the cut file as .png in PSE. Then I printed them all on a 8.5x11 page so I wouldn't waste photo paper. After that I placed the yellow polkadot paper frame over each photo, and cut basically around it without having to be too fussy because I would just place the whole thing underneath the woodgrain paper. I actually finished the entire page (not including printing the photos) in under 3 hours yesterday, in 3 increments during Natalie's naps!


I just love how this page turned out! My husband, of course used his basketball analogy, and said this page is a triple-double! Thank goodness I didn't get the "even Michael Jordan didn't shoot a triple-double every game" speech :)

Monday, January 6, 2014

More Please

I never thought I'd be so excited to give my baby solid food! She loved her sweet potatoes and she knew right away to swallow them and stretch out her neck for more haha! Hungry girl :)


I kept this one pretty simple and used the Blue Note kit from Studio Calico. I printed out my pictures in a square and then cut the die cut from my Silhouette - that die cut came in the Life Scripted class with Kal Barteski, that starts in February.


I decided to use my journaling as a border around the square and then added a tiny bit of stitching at the top, but I guess I wish I had used a different color to show up a little better, oh well!

Sunday, December 29, 2013

Scraplift Challenge!

I participated in a Scrap Lift challenge, where we just scraplift the person who commented on a thread before us over at Studio Calico! Here is the layout I scraplifted by Melissah3 :)


I used both her layout arrangement and color scheme to make this layout that my husband REQUESTED I make! He had taken this photo from work and I had him write the journaling himself :)


I used the Blue Note kit from Studio Calico and cut the snowflakes with my Silhouette! This was fun, hope to do another one sometime!

Thursday, December 5, 2013

December Daily Day 4

I love this project! Where else would I get to scrap this random pic I took yesterday morning when Natalie woke up and I found her crazy and sideways in her crib, "walking the rails" because she just learned (on day 3) how to roll onto her side!? She kicked one of her socks off on the rail and fell to the floor under her crib, and the other one she kicked off in the crib!


For this left side, I just printed a snapshot of my text to Chris. I added a little bow from the Printshop collection by Shanna Noel at Studio Calico - so cute!


Originally I had a black piece of paper for the right side, but I flipped it over to the other side and liked the way that looked with my photo better. Then I had this random piece of reddish color paper in the bottom left on the left side that I tossed because it no longer went with the color scheme, so I just picked one of the leftover 3x4 pieces I have and used that instead.


So I can't believe I haven't fallen behind yet, which sounds silly on day 4, except I'm barely scratching by! I've only prepped through day 9 and it seems to be taking me longer to make these spreads than a 12x12 page haha! I guess I'm just not used to the handbook size, but also half the time is spent selecting, editing, and printing the photos to the sizes I like. We'll see how long I last, but hoping if I do get behind I can play catch up on the weekends!

Sunday, December 1, 2013

Pick One

The title of my page is sort of like telling myself to choose a design concept... I kinda got everything going on in this page ha!


This was the last of the pics from the public market and also the last page I planned to make with the Cuppa kit from Studio Calico, so I definitely wanted to use those colored transparency squares! I started playing around with the layout and cut a few more squares from patterned paper then embellished here and there to finish it up.


It is another grid layout for the books! Oh well, I'm happy I am caught up with pictures and layouts and here it is, December 1st, just in time for December Daily! Yay!!

Wednesday, November 27, 2013

Public Market

The weekend before last weekend, we took Natalie to the public market for the first time! Well, we didn't go for her, we went because she had had enough awake time and was ready to nap (so we knew she'd just sleep in her car seat carrier) and it was still early before it got to crowded, and it was probably the last weekend we could take her and go as a family before it gets too frigid out! So I put on her little green knit hat that was made by my cousin, and we flew out the door before 8am! Um, I never fly out the door before 8am... or at least I didn't before I had a kid!


Anyway, I knew when I printed that picture of the painted murals on the wall outside the market that I wanted to use that background paper from the Cuppa kit by Studio Calico. It went perfectly! I just had to figure out what else to do with it, so I opened my Silhouette software and do what I often do when I'm lacking on ideas and embellishments (I didn't buy any scrapbook add-on kits this month since I knew I'd be going back to work and probably not scrapping as much). Anyway, I landed on those sketchy circles that I purchased back in February from Studio Calico and cut out 5 of them from that clay-colored paper that came in the card add-on kit.


Beyond that, it was really pretty simple! Gotta love how easy the Silhouette makes life (if you're a scrapper haha)! I love the software, and before cutting them out, I placed them in the software sort of where I'd want them on my page to get an idea of the size and how many to cut. Now hopefully I'll get the rest of my public market pics scrapped over the long Thanksgiving weekend so I can concentrate solely on December Daily for the rest of the year!!

Tuesday, November 12, 2013

Hello

I love this layout! A couple reasons, but I'd been mostly dying to cut those teepees with my Silhouette, that were part of Shanna Noel's digital cut files from Studio Calico last month!


Once I did that, the rest was pretty easy - I just used the Printshop collection again, also by Shanna Noel, to complete the layout. The stars and circle are vellum stickers and pieces, and I used a white "hello" rub-on directly onto the picture which turned out awesome!


My favorite part of this picture is that I got a chance to journal about how both Chris and I remember getting our pumpkins from Green Acres (in the pic) when we were little, and how I love how, because we are from the same hometown, we have a lot of shared memories, just not with each other. But it's so cool to reminisce together even though we didn't really know each other!

Saturday, October 26, 2013

Teenage Boy Birthday Card

I made this card for my sister-in-law's nephew who is turning 16 this year! You'd think that's a tough crowd to make a card for, but last year he loved this karate-themed birthday card I made for him so much I couldn't wait to make him another one - such a good kid!! There are some grown men who don't even notice when I've handmade a card for them, but he noticed and since he didn't open it in front of me, he later thanked me with details of why he loved the card!


Anyway, I thought I'd keep it simple and clean, so I used my Silhouette to cut out the diamond pieces, which were the blank cuts that were meant to coordinate with the Cotton Candy stamp set I purchased from Studio Calico last month! I love being able to buy the blank cuts that go with the stamps, then you don't have to cut them out by hand and makes life so much easier haha!


I thought about using different colored stamp pads to stamp with, but decided it would just look cleaner with simple black and white. When Chris got home from work the other day when I finished it (and that's when I setup my scrapbook layouts or cards out on the table for him to see/admire hehe), he immediately said he loved it - I love when he truly loves something I've made, because he'll go, "That's so awesome, don't you love it!?" because he's so thoughtful and wants to make sure I love it too! Haha, OK enough with the love fest, but seriously I hope Stewart loves this card as much as last year's card!

True Story

This layout will sit opposite the last layout, of Chris and I taking Natalie to get our pumpkins - sorry Natalie, you didn't get a pumpkin this year! But she did get to go see them if she wanted to wake up for it haha!


OK this was my 11th, yes 11th layout I made with the Antiquary kit by Studio Calico and officially the most amount of layouts I've made with one kit and officially I am a bit tired of Antiquary even though I really loved it, especially the parts of the Printshop line designed by Shanna Noel for Studio Calico that were part of it!


Anyway! I cut the background from my Silhouette, which was one that I had purchased from Studio Calico quite a few months ago - I went this route because I knew I could get away with little embellishments and really I didn't know what embellishments to use at this point, so I just punched some circles and slid them randomly underneath the background portion and adhered! I added those little typed sentiments and one more die cut from In a Creative Bubble for Studio Calico. I didn't need to add any journaling on this page since it was all on the last page - so another layout done in under an hour while Natalie napped! I am just loving the feeling of getting a layout done so quickly!!

Thursday, October 10, 2013

Lone Baby

I saw the perfect shot for a fall-looking photo even though it was super hot and humid out on the Erie Canal! The heat shortened our walk, but at least we got out for Chris' last weekday off from work before his paternity leave was up!


This layout came together super quick but started off with a patterned paper background. Once I cut those strips of paper though, it seemed they would stand out the best against a black background... and luckily I had 1 sheet of black card stock left, just one!!


I used the Antiquary Studio Calico kit and made and cut the banner myself - I used the font "Gungsuh" at 40pt, character spacing 95% to fit inside the banner but also be readable.

Wednesday, October 9, 2013

Zzzz

This is my baby's favorite position to sleep in, in her crib! Haha, she's so crazy!


Um, this is the first time I have ever used up an entire set of alpha stickers haha!! I just loved how well they matched the picture, so decided to use them a little differently! I love the contrast against the darker background!


Again, I used the new Studio Calico kit, Antiquary and loving it so far!

Tuesday, October 1, 2013

December Daily Finished!!

Woohoo, I finally finished December Daily 2012!! I know it's October 1st, 2013... but... well... um... I never completed my December Daily and thought it would never happen. But then Studio Calico posted some sneaks of their upcoming December Daily kit with Ali Edwards for this year and I really like that it's going back to a bigger size, so that was the motivation for me to finish up DD from last year so I wouldn't feel so guilty about pre-ordering this year's kit!! I had finished up to Day 12, but had stopped and then thought it wasn't going to get finished, but the long break from it actually helped me get some pages done quickly and over the past couple weeks I was able to finish it out! Here are my pages!


Day 13: I found some scraps of paper and stopped worrying about finding the "perfect" use for that gold polkadot vellum paper, so I just kept it simple and moved on.

Day 14: Not too holiday-ish but I used the postcard from the Studio Calico journal boxes and some airmail twine since Chris' coat had blue and red to match and he came home for lunch that day to take a walk with me!

Day 15: I had seen one of Ali's pages I think it was that had the diagonal red lettering like that, so I used it for my title - this was me and my friend scrapping December Daily haha!

Day 16: I had also seen somebody use those Studio Calico diamond stickers like this as well and scraplifted the idea. I decided to keep my album holiday-themed in appearance even for non-holiday themed photos!

Day 17: Another quick layout - I had decided if I was going to finish this by the end of September (which I would have if Natalie wasn't sick and kept me busy all day yesterday), then I would just have to keep these pages simple!

Day 18: I looked back to my 25 Days class pdf's and saw Kinsey Wilson had a layout where she used that washi tape diagonal, so I did the same, but added in the sparkly silver washi since it sort of matched my new/used car!

Day 19: Just some simple stamping and embossing here

Day 20: I had printed out some of the class printable labels and decided to stamp on them and add some to the journal box along with some of those enamel dots - simple!

Day 21: Again just simple, did some stamping and added some stickers and called it a day!

Day 22: My least favorite but I got it done - I cut the note card from my Silhouette


Day 23: Decided to also embellish the photo a little too - what a difference that makes!


Day 24: I used the multi print feature (not sure what it's called exactly) on my Canon Selphy CP800 and decided to mimic the layout on the opposite page! I love how it turned out and it was so simple too!

Day 25: My only use of a transparency, I had cut that Dec 25 glittery piece with my Silhouette last year! I bought it from the Silhouette online store with the intention to use it specifically like this... I just didn't know I wouldn't get to it for another 10 months!

So there it is!! 2012 is completed and I'm ready to do this year's and maybe even finish it before October 1, 2014!! Haha, no promises though!

Sunday, September 22, 2013

Love These Moments!

More and more I am realizing that a great majority of what really makes a great layout starts with great, high quality photos! What a difference when I use our nice DSLR camera versus when I use my iPhone or point-and-shoot! And I only got these printed at Walmart, so I imagine how awesome they'd turn out if I got them printed at a "real" photo processing venue!


Anyway, this is the left side to my last layout, from when we took Natalie outside randomly, to have playtime outside! I just used the auto setting for the photos, but having awesome daylight also makes a huge difference. Too bad I couldn't photograph my layouts in such high quality!


Again, I used the new Amy Tangerine Cut & Paste line by American Crafts! I had already cut that inside square piece of paper, when I was thinking my layout was looking really square-y, so I decided to cut the pictures into circles and add other circles to it! I cut the Love Love Love bubble from my Silhouette, which was a digital cut file by Studio Calico this month. Once I had the idea, this layout came together quickly and easily!

Monday, September 2, 2013

Home Sweet Home

We brought Natalie home from the hospital 2 days after she was born, which ended up being my actual due date. (Hard to believe that was only 2 weeks and 2 days ago!) We had had a rough 2nd night with her, as she started to become hungry and need diaper changes... and so when we were getting ready to take her home we were so scared she would scream and cry the entire way. Luckily, she, along with lots of other babies, was soothed by the car ride and was just fine! We got her home, safe and sound :)


My main inspiration was the latest member video from Paperclipping.com - I used papers from the Valley High kit by Studio Calico to start, but then added random embellishments to complete.


I cut the Home Sweet Home die cut with my Silhouette, that I purchased from the Silhouette online store.


Hoping this good start to Natalie's baby album keeps up so she doesn't get to be 5 years old before I finish it!