Showing posts with label In A Creative Bubble. Show all posts

Sunday, November 16, 2014

Shine

ABOUT THE PHOTOS:
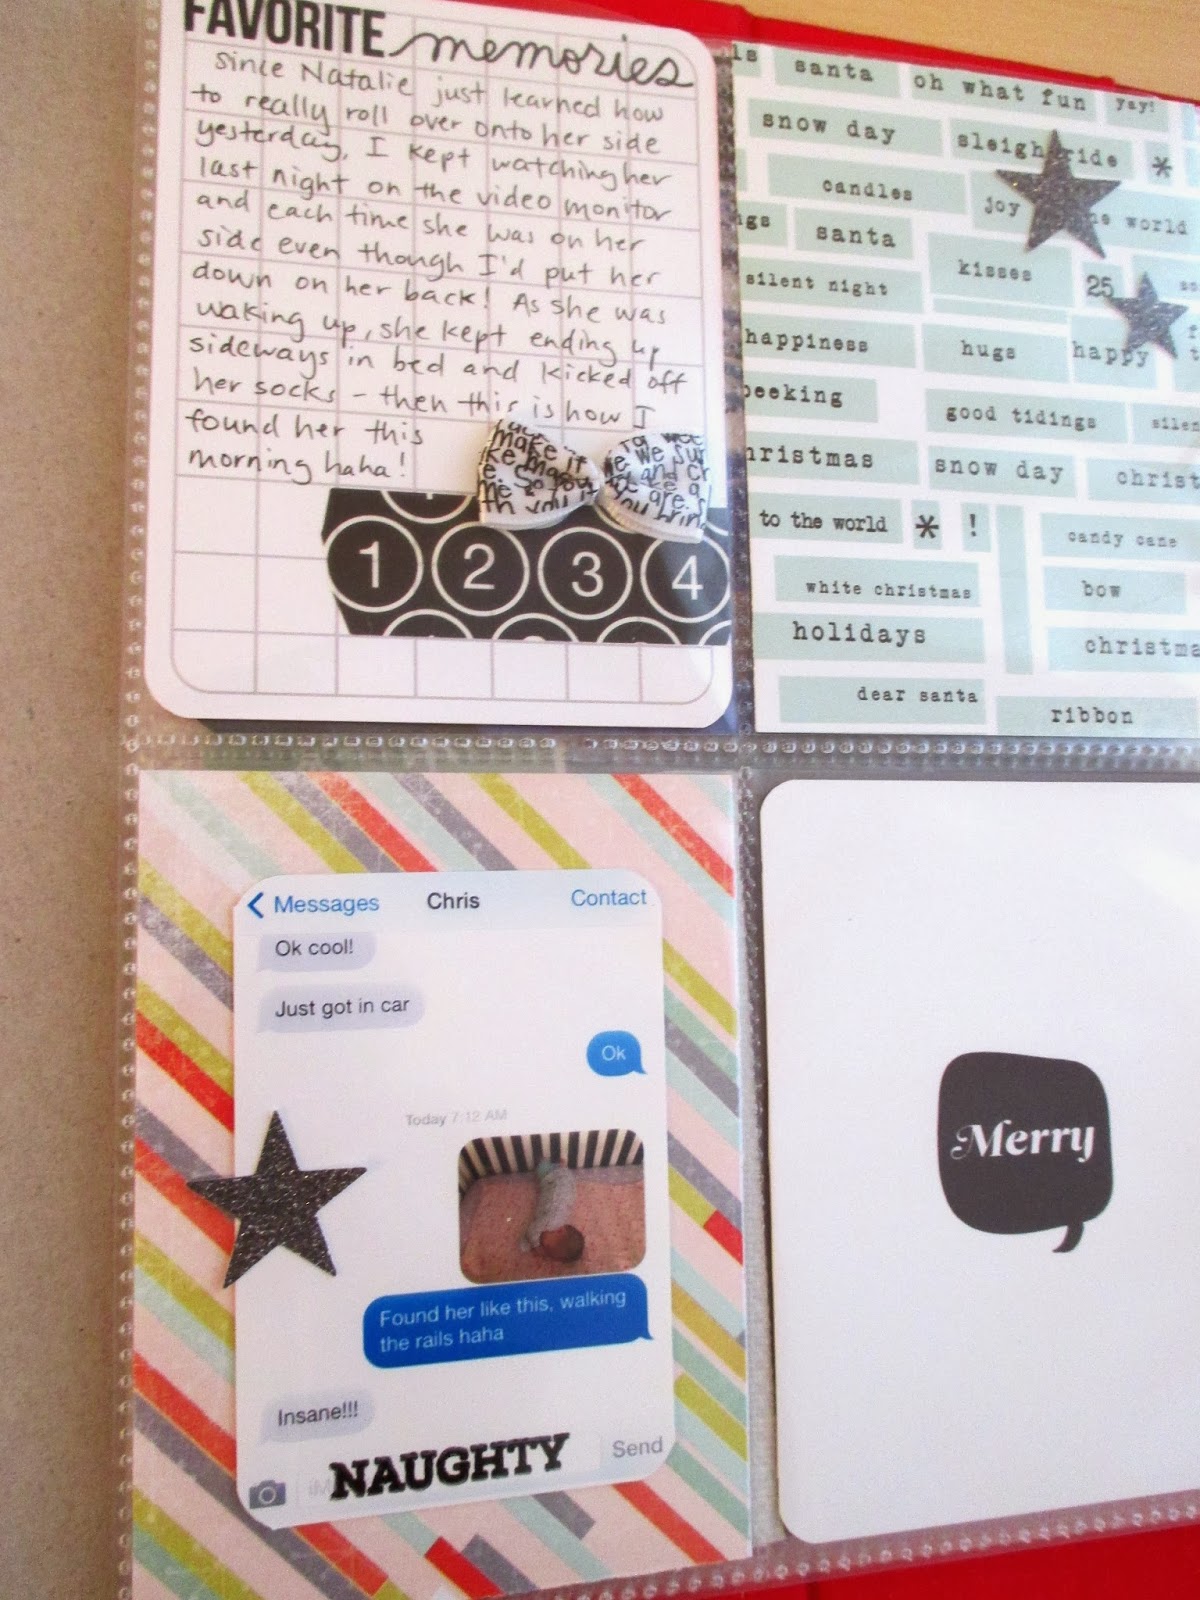
This photo was taken last year on December 1st for December Daily! Why am I just now scrapping this photo? I began this layout "story first" by using a Story Starter from Simple Scrapper's Premium Membership. I had a story that I started to write, and ended up with a much deeper story that I printed and slipped into the glassine bag pocket. It's been interesting how using these prompts has really made my pages seem more meaningful, when I honestly didn't think much would change!


LAYOUT DESIGN:
Onto the layout design, I again used an older Sketch Template from Simple Scrapper's Premium Membership! I really stuck closely to the sketch template, even though it was for an 8.5x11, I easily stretched it to work with 12x12. At first I was thinking I didn't "change" it enough from the template, but then I realized that's why I love the templates - when someone goes back to look at my pages years from now, they will not be thinking, "Oh, this is like an exact replica of such and such Sketch Template from Simple Scrapper" haha! (I'd be impressed if they did!) Anyway, I love how the membership includes these templates, that come to you as a layered PSD template as well as just sketch image, so I can drop my photo(s) in and see how the end result might look and move things around even if I don't work fully digital!


MY PROCESS/PRODUCTS USED:
I used this month's Christmas themed add-on kit, Pine Hill, from Studio Calico, as well as a few items from my stash. The 3x4 card was from a printable set by Geralyn Sy for In A Creative Bubble from last year and the vellum label is from Crate Paper a couple year's ago. The glassine pocket came with this month's kit and Chris just came downstairs and looked at it and goes "that's cool you used an eggroll bag" hahaha.


The Premium Membership at Simple Scrapper provides skills and shortcuts to help you simplify and find more meaning in your memory keeping.

Friday, August 1, 2014

#Staycation2014

ABOUT THE PHOTO(S):
We cancelled our planned trip to Florida last minute in June and ended up on a Staycation instead! It ended up being a good break for our family, even though Natalie was teething the first half of it!


LAYOUT DESIGN:
I basically copied this layout by Paige Evans, because... well look at how awesome it is!!


MY PROCESS/PRODUCTS USED:
First I cut the world map using my Silhouette Cameo with this world map shape I purchased in the Silhouette online store! I used the paper and wood veneer numbers from this month's Penny Arcade kit from Studio Calico, but then used a combination of the Printables by In A Creative Bubble by Geralyn Sy and the free printables by Hello Forever by Marcy Penner that went with the Brighton Pier collection this month to layer around the photos! I just love how the photos are us staying home and the page shows a map of the world and that "Jetsetter" embellishment :)

Sunday, April 27, 2014

True Story

Daddy had to take over and provide Daddy Daycare for Winter Storm Vulcan back in March. Natalie enjoyed it!


I used another sketch from this month from the SimpleScrapper.com, and mostly the printables provided by Studio Calico by In A Creative Bubble!


I used an Amy Tangerine heart stamp to stamp on the RAD title! This one was fun and easy to put together with the help of the sketch!

Sunday, December 22, 2013

December Daily Day 21

OK so a few things - Natalie ate her first solids yesterday, just a little banana mixed in with mama's milk! She wasn't too sure about it, but did a few swallows. Also, she really got into her rolling over and every time I put her on her back she flipped immediately to her stomach! It was so fun to watch her in her cute little giraffe print cloth diaper!


For both sides, I used a combination of apps - Afterlight to edit them a bit, then PicFrame to drop them into frames and add the little captions. I like having the option to do this, but I took most of my time on doing all that so by the time I got to work on the page spread it was LATE! I was so tired today!! For this left side, I added the stamp along the top, embossed in gold glitter Zing and used that thin washi tape yet again to help make the star on the patterned paper stand out - I really need more thin washi tape!!


For the right side, I kept it real simple here too, and just tried to incorporate some of the same elements on both sides. The silent night card is from In A Creative Bubble by Geralyn Sy.


That's all - it has taken me a couple days to post these because Natalie has been awake A LOT lately. Not sure if it's a growth spurt or what!! Oh well, only 4 more layouts to do and my DD will be complete AND now that we're on the final stretch, I think I will get it done before the end of the year - WOW! That means I will have done 2 December Daily's this year haha since I had to finish last year's album in September :)

Friday, December 20, 2013

December Daily Day 19

I love documenting this month like this! Yesterday Natalie hit another milestone - she rolled over from her back completely to her stomach for the first time! It's so exciting when she does something new!! I grabbed the camera and took a bunch of photos right after she rolled over.


So last night I got a late start and didn't feel like working on this spread too late but luckily I had already cut out and printed the printables I had purchased from Geralyn Sy's shop, In a Creative Bubble! That made this spread quick and easy again. This left side I also had taken a picture of Natalie's legs while she was in her jumparoo without pants on... just look at those chubby legs!!


The right side I had taken a pic in the morning of Natalie in the K'Tan baby carrier while I finished up some house work, and of course we always stop in the bathroom to look in the mirror because she just loves it! I just added some washi tape, a tag, and trusty number clip for day 19 and done! So easy!


It's the final countdown, woohoo!

Thursday, December 5, 2013

December Daily Day 4

I love this project! Where else would I get to scrap this random pic I took yesterday morning when Natalie woke up and I found her crazy and sideways in her crib, "walking the rails" because she just learned (on day 3) how to roll onto her side!? She kicked one of her socks off on the rail and fell to the floor under her crib, and the other one she kicked off in the crib!


For this left side, I just printed a snapshot of my text to Chris. I added a little bow from the Printshop collection by Shanna Noel at Studio Calico - so cute!


Originally I had a black piece of paper for the right side, but I flipped it over to the other side and liked the way that looked with my photo better. Then I had this random piece of reddish color paper in the bottom left on the left side that I tossed because it no longer went with the color scheme, so I just picked one of the leftover 3x4 pieces I have and used that instead.


So I can't believe I haven't fallen behind yet, which sounds silly on day 4, except I'm barely scratching by! I've only prepped through day 9 and it seems to be taking me longer to make these spreads than a 12x12 page haha! I guess I'm just not used to the handbook size, but also half the time is spent selecting, editing, and printing the photos to the sizes I like. We'll see how long I last, but hoping if I do get behind I can play catch up on the weekends!

Wednesday, December 4, 2013

December Daily Day 3

So this time I definitely got better pictures! I took our good camera out with me on a walk around the neighborhood with Natalie at lunch! Any pics of her will be great, and then any pics of her bathed in natural light will be my favorite days!! And you just can't beat that toothless grin... my heart just melts as I look at that picture!!


I had most of this spread prepped and ready to go, except I removed a filler card from the right side where I added her picture and the stamp "Love this" embossed in gold glitter Zing!


It's Day 3 and already I'm learning what I like and don't like... as I said yesterday, I like pictures on each side of the spread. I also realized I don't like in places where I've prepped and force myself to use the same card or paper for both sides. I like being able to move around the pieces I do have prepped after I print my photos to see what looks best, but if the back is being used on the previous or next spread, then I'm sort of locked into my placement - I don't like that!


Other than that, you can see I didn't mind that my photos didn't match the papers I used here - her blanket is purple but there's a lot of red in this spread. Oh well! :)

Sunday, December 1, 2013

Pick One

The title of my page is sort of like telling myself to choose a design concept... I kinda got everything going on in this page ha!


This was the last of the pics from the public market and also the last page I planned to make with the Cuppa kit from Studio Calico, so I definitely wanted to use those colored transparency squares! I started playing around with the layout and cut a few more squares from patterned paper then embellished here and there to finish it up.


It is another grid layout for the books! Oh well, I'm happy I am caught up with pictures and layouts and here it is, December 1st, just in time for December Daily! Yay!!

Friday, November 29, 2013

Yum!

A public market staple is having breakfast at Juan & Maria's Empanada Stop! I always get the veggie breakfast empanada. We keep saying we wish they'd sell their Spanish ketchup though, it is sooo good! Maybe Natalie will like an empanada someday with her parents!


I scraplifted this layout by Geralyn Sy from this week's Sunday Sketch at Studio Calico:


I used the Cuppa kit and for the squares at the bottom, I just used a piece of the 6x6 paper pad that had those squares already on it.


OK, gotta run, baby's calling!! :)

Sunday, November 24, 2013

Dedication To Our Lord

Natalie had her baby dedication a couple weeks ago at church! Her face in this picture is priceless! She was not a happy camper right before we went up there, but luckily she didn't cry at all during it.


I used this month's Cuppa kit from Studio calico and got some inspiration from these two layouts by Amy Tan and Sasha Farina, specifically I liked how Amy divided her page to make it look like a mega phone and I liked how Sasha added in the white paper (except I just added white strips instead of cutting the paper and mounting on white). Unfortunately, with my black letter stickers, I was out of L's and S's and only had 2 H's so I was very limited what I could write (I thought about Jehovah Jireh but that requires 3 H's) so I picked some additional white letters from Heidi Swapp. I stamped underneath and above with my giant roller alpha stamp to spell out Natalie's name.


For the bottom portion, I just used a bunch of the printables for this month's kit from In a Creative Bubble as well as some cardstock stickers from Hello Forever, which made it come together really easily!

Tuesday, November 19, 2013

December Daily Foundation Pages Part 2 (Days 1-8)

OK so this second part of preparing my December Daily pages is taking me a lot longer, but mostly because I am back at work now and not really scrapping during the week anymore! Bummer! I need to take more maternity leaves :)

Anyway, slowly I am making my way through this album, trying to prepare as much as possible before December actually hits! I went through and started my foundation pages here, but since then I already changed a few things. I signed up for the 25 Days class with Maggie Holmes from Studio Calico and I bought some of the Holly Jolly collection from In A Creative Bubble by Geralyn Sy. So I ordered all my digital items from the class, from the shoppe, and from the original DD kit online from OfficeMax Impress Printing Services! I ordered them to be printed on bright white 80# cover stock - so they'd turn out brighter than if I printed at home, and also have a slight shine to them. The files printed and turned out great!

So after I received all these new cards, I went through the album again and swapped out some of the papers I had cut out with the new cards. Then I finally got started for real. Keep in mind, I've decided not to care if my pictures will match - theme or colors! I will keep it holiday-ish and figure if worse comes to worst, I will print my pic some days in black & white or sepia to match!

Here's my cover! I kept it simple and knew I wanted to use those gold letter stickers - I have an extra theme since this is my daughter's first Christmas! I'm sure she will be in a majority of the pictures (why else would you have a kid hehe)!

The only day of the season that I sort of know what we will be doing is Day 1 - I want to always pick out our tree! Except this year, we might not have room for a tree... but even if it means getting the LED tabletop tree from the basement, that will be the theme haha! I used the wood veneer trees from last year's kit (I cheated already and used other stash)!

This Day 2 page came together last out of all these pages so far - I kept going back to it, and finally filled one of the pockets with that white brick wall paper from Studio Calico's latest Cuppa kit! I used the Silhouette to make some cuts and also used some Ali Edwards stamps I purchased from Technique Tuesday:

Day 3 sort of stumped me too, so I'm not crazy about it, but that's ok!

For Day 4 I used a bow from the Printshop collection at Studio Calico, to add some much-needed dimension!

Day 5 is the first page I really love! I finally used one of those gold number chipboard clips and incorporated some gold POW paper to cut out a reindeer head... what I didn't plan on was using that negative like that - I originally was planning to use it for a border around a square 4x4 pic but if I don't have one, then I sort of like just the cut by itself! I would just need to decorate a little more but it works!

I kept day 6 much simpler, and just added that black glittery star from a pack of star stickers I bought at Target - I think they were from American Crafts, part of a Halloween collection!

For day 7, I had some really shiny gold paper I had bought awhile back from one of the LSS (Local Scrapbook Stores) and cut out that ornament and punched some circles to match the gold number again!

And finally for day 8, I got some inspiration from Maggie's foundation pages in her 25 days class and added some sequins and wood veneer 8!

Hopefully I'll get some more days done before December hits and post them, but wanted to get these up as soon as I could! Thanks for stopping by!!