Sunday, May 27, 2012

Bridge Walk

Last "Black Friday" in the afternoon, Chris and I were just driving around and randomly he drove us for a walk across the bridge across from Kodak Park (still don't know what it's called). It was pretty cold, so I bundled up in his fleece and hat and braved the high bridge and cold air!


I finally broke into the 35mm kit from Studio Calico and completed my first layout with it - only a few days till we get the next kit, oops! Hopefully I'll get at least one more layout done before we get the next one!


The inspiration was just the kit and after I chose that paper, I decided it was decorative enough it wouldn't need too much added to it! I chose a lighter color because when I looked at the pictures against a dark background, it looked a bit too dreary and wintery/gray. Even though this is Rochester, NY, it's not so bad as it looks in winter pictures sometimes!


HOW-TO:
  • I used the 35mm kit by Studio Calico
  • The main sheet of paper is Societe Paper from the Follow Your Heart "Be Amazing" collection by My Mind's Eye
  • I cut out some of the hexagons by hand and taped pieces of Turquoise Wood Paper from the On the Brightside collection by My Mind's Eye behind the cut out hexagons
  • I misted the color magic letter stickers from Heidi Swapp by Pink Paislee with Bluegrass Mister Huey's by Studio Calico
  • The "walk" stickers are Olive & Cream sticky keys by October Afternoon
  • The two die cuts are exclusive die cuts from Studio Calico and the Camera badge is a Marcy Penner Exclusive
  • The washi tape and twine are from Freckled Fawn
  • The photo frame is from a Memory File Vintage Instaframes from Heidi Swapp by Pink Paislee and the yellow gems are Twinkle Goosebumps by Queen & Co.

Tuesday, May 22, 2012

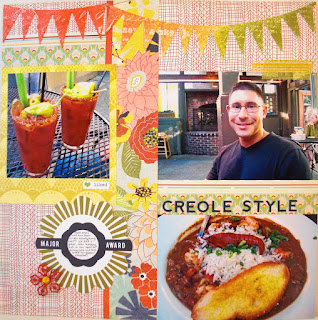
Creole Style

I'm back from Indiana and finally starting to feel better after getting sick towards the end of the trip! I scrapped this page last night, with the rest of the pics from our last meal in Atlanta last fall before going on to the Florida portion of our vacation. We enjoyed many a Virgin Bloody Mary on this trip and these were the best we had!


Chris just loves Creole style food and enjoyed his gumbo, which he said was actually "étouffée" (OK, now that I wrote that for this blog entry, I just had to look up what the heck that is and found a description explaining the differences of gumbo, jambalaya, and étouffée here)!


Anyway! The idea for the layout came from Kelly Purkey's Sketchpad class pdf! My favorite part of the layout was the mistable banner - I was able to mist it to match the colors from the layout! The rest of the page, minus the banner, letter stickers, and washi tape came together using the PB&J line by BasicGrey. I loved the colors of the line and they went perfectly with these pictures!


HOW-TO:
  • The papers, "Major Award" embellishment and metal flower were from the PB&J collection by BasicGrey
  • The banner is the Heidi Swapp Color Magic Banner Delicate by Pink Paislee - it was my first use of anything "mistable" and I misted using Mister Huey's mists by Studio Calico in Schoolhouse, Lemonade, and Applejack
  • For the misting, Chris even helped a little (at first I needed help getting the Schoolhouse color going and then he wanted to do some misting too)! He thought it was so cool when I started wiping away the mist and revealing the pattern underneath... but then quickly went back to the garage, probably to clean something!
  • The letter stickers are Newberg Navy Alpha from Jillibean Soup
  • The banners and letter stickers both came in the Lomography add-on kit from this month's kit "35mm" by Studio Calico
  • Lastly, I filled the tiny space above the top right photo with a couple pieces of washi tape!

Tuesday, May 8, 2012

Washi tape birthday card!

I am so excited to give this birthday card to my fellow scrappy friend Kara (just hoping she doesn't look at this blog before I give it to her)! I think it's so fun giving to another scrapper because they know what goes into it :)


I had all this washi tape, and am so excited to start the Washi Workshop next month at Studio Calico... I randomly stumbled upon this display and just had to start this card!


All I did was organize my tapes in "rainbow" color order, then started adding from top to bottom... I loved how there were a couple with words on them! I added some Sassafras letter stickers and voila, done!

Sunday, May 6, 2012

More Mothers Day cards!

This first one is for my Mother-in-law, I printed out a pic of my husband and niece (her son and granddaughter) - and since I'm away next weekend, we gave her the card this evening, and of course she loved it!


I used the Sassafras paper from the Studio Calico City of Lights kit and stamped the letters to create the sentiment on top, add some washi tape and voila - card done :)


This next card is for my sister-in-law, with a pic of her daughter from her 2nd birthday party that just made me laugh! My niece is just never still and never dull, and this pic of her just sort of sums up her little personality! We gave this card to her tonight also and she laughed when she saw the pic as well!


I used paper and cardstock bits from the Dear Lizzy line by American Crafts, along with Sassafras letter stickers and Jillibean Soup twine.


Mothers Day card

Here's the first a few Mothers' Day cards I will be making this spring - this one is for my Mom! I know she'll love it, and as I told my husband, since I used whole pack of wooden buttons on it, it is an expensive card hehe! But it feels great to use up the supplies I've bought, especially for a card for someone I love :)


The idea for this card came from Sketch #2 in the Sketchbook 4 online class! I just kept it simple and also used the same idea Davinie used from sketch #6 for the stitching portion of the card!


HOW-TO:
  • I used the City of Lights kit by Studio Calico for most of the card
  • The pink paper at the top is Light Pink Quatrefoil by Echo Park Paper Co
  • The piece at the bottom is called Invitation from the Pretty Party collection by Crate Paper
  • I hand stitched on top of that before I adhered it down
  • I used the back of that piece of Crate paper to stamp the sentiment with individual letter stamps using Soft Pool Shadow Ink by Hero Arts
  • I just sort of eyeballed it and adhered the Dear Lizzy Wooden Buttons and Epoxy Accents by American Crafts with zots

Saturday, May 5, 2012

Engagement card!

My other cousin I am going to see in Indy next week got engaged!! I am excited to meet her fiance and hear all about the engagement!


I got my inspiration for this card from Sketch #9 in the Stetchbook 4 class and more specifically, the card done for it by Dawn McVey! I normally don't leave any "space" in my cards, but this really turned out great!


The subtitle for this card could be "love >>> the best feeling" because of that lovely brad and sticker!


HOW-TO:
  • I used all products from the Sketchbook line by Amy Tangerine for American Crafts, except the polaroid stamp from Studio Calico and the small bit of twine by Jillibean Soup
  • The left-most piece of paper came from the 6x6 Sketchbook pad that I cut out and corner rounded
  • The layered embellishment is a layered sticker
  • The right-most green tag was also punched out of 6x6 Sketchbook pad paper
  • The orange grid arrow is one of the fabric stickers while the camera and the phrase are regular stickers
  • I just love those foam letter thickers!
  • The love brad was the last piece I added because I kept thinking, I'd really like it to say "love" inside that camera image... and while searching for a sticker, I came across that brad, perfect!

Friday, May 4, 2012

Birthday Card!

I will be busy making some cards this weekend, so here is the first - a birthday card for my cousin, who I'm going to see next week! Me and my two girl cousins are meeting up in Indiana where my parents are from and where my one cousin still lives! I am sooo beyond excited, especially because they are cousins from my Dad's side of the family. My Dad passed away in 1997 from Multiple Myeloma (cancer). I love that they share memories of my Dad. While we're there, we're going back to Turkey Run State Park to hike some of the trails that we used to at our family reunions! All of us staying there together was so much fun!


The layout of the card came from the first sketch in the Sketchbook 4 class, but mainly I drew inspiration from the layout done by Danielle Flanders! I loved her use of washi tape and the colors she used, but had to shrink it down to fit my card.


HOW-TO:
  • I prefer to use a 5x7" card these days because you can get so much more on there than the A2 size
  • Most of the supplies are from the City of Lights Kit by Studio Calico
  • The yellow piece of paper was leftover from my "Monkey Business" layout, called "Sunflower" by Lily Bee - I cut that to 6"x3.5"
  • What I should've done was just put the washi tapes down first, then figured out how big to make the small sheet of paper, but oh well - the washi tapes I used were: Aqua Airmail Washi Tape by Freckled Fawn, black dots SMASH tape by EK Success and Pickle Juice Dot by Bella Blvd
  • The Kraft tag with hearts is a With Love Gift Tag by Pebbles
  • The button is from the Pretty Party collection by Crate Paper
  • The butterfly stickers are by Sassasfras
  • I used glossy accents to adhere the stick pins from the PB&J collection by BasicGrey
  • The twine is from Jillibean Soup and the letter stickers are Scene thickers from Amy Tangerine's Sketchbook collection by American Crafts
  • Phew, list done!

Tuesday, May 1, 2012

Real Food

This layout will look much better once I complete the other side with the matching pictures to make it look more interesting since this is mostly just a lot of writing... but these pics were taken when Chris found us a fun place to grab a bite to eat last October in Atlanta - a creole/New Orleans style restaurant with outdoor seating downtown!


I had a nice advantage for building this layout this time - we just got back from a week in Miami, so I had a build up of 4 new layouts to choose from, from the Sketchbook 4 online class! So instead of just using the next layout in the class, I decided that these 2 pics would go perfectly with sketch 11 from the class!


Making the tabs and labels was an afterthought, after seeing all those corners of paper come together - they lent themselves nicely to making a tab for each layer! Then I decided it wouldn't hurt to add some small lettering so decided to put my Dymo label maker to use and printed away!


HOW-TO:
  • This layout mostly uses the new PB&J collection by BasicGrey that I just got in the mail (while we were on vacation) and came back to!
  • The letter stickers are foam thickers by American Crafts and the tab punch is by Fiskars for Jenni Bowlin Studios